DCR Germany Static Google Tag Manager: Difference between revisions
From Engineering Client Portal
MichelFodjo (talk | contribs) |
MichelFodjo (talk | contribs) |
||
| (5 intermediate revisions by the same user not shown) | |||
| Line 59: | Line 59: | ||
Web Page Metadata should be ready when initializing a new SDK instance. | Web Page Metadata should be ready when initializing a new SDK instance. | ||
The full description of the other key/value pairs for Metadata can be found here: | |||
'''[[AGF Metadata Convention#Static Measurement|AGF Metadata Convention for Static Measurement]]''' | |||
| | |||
===== Example Web Page Metadata Object ===== | ===== Example Web Page Metadata Object ===== | ||
<syntaxhighlight lang="html"> | <syntaxhighlight lang="html"> | ||
| Line 81: | Line 70: | ||
section: "Unique_section_ID", | section: "Unique_section_ID", | ||
segA: "Unique_section_segA", | segA: "Unique_section_segA", | ||
segB: " | segB: "Mandatory_section_segB", | ||
segC: "Optional_section_segC" | segC: "Optional_section_segC", | ||
subbrand: "subbrand_received_from_Nielsen" | |||
}; | }; | ||
</script> | </script> | ||
| Line 135: | Line 125: | ||
section: "Unique_section_ID", | section: "Unique_section_ID", | ||
segA: "Unique_section_segA", | segA: "Unique_section_segA", | ||
segB: " | segB: "Mandatory_section_segB", | ||
segC: "Optional_section_segC" | segC: "Optional_section_segC" | ||
}; | }; | ||
| Line 174: | Line 164: | ||
<!-- End Google Tag Manager (noscript) --></syntaxhighlight> | <!-- End Google Tag Manager (noscript) --></syntaxhighlight> | ||
== Step 2: Privacy and Opt-Out == | == Step 2: Review Privacy and Opt-Out == | ||
The Browser SDK | The Browser SDK measurement is working without cookies and other personal information. No user can be identified personally, therefore an opt-out functionality is not required. The Nielsen Browser SDK measurement is utilizing a cookieless domain. | ||
In order to disclose Nielsen measurement privacy statement, please include the following items in your privacy policy: | In order to disclose Nielsen measurement privacy statement, please include the following items in your privacy policy: | ||
* A notice that the player includes third party measurement software that allows users to contribute to market research with anonymous data. | * A notice that the player includes third party measurement software that allows users to contribute to market research with anonymous data. | ||
* A link to the Nielsen Digital Measurement Privacy Policy located at https:// | * A link to the Nielsen Digital Measurement Privacy Policy located at https://nielsen.com/legal/privacy-principles/digital-measurement-privacy-statement/?lang=de . | ||
== Step 3: Testing == | == Step 3: Testing == | ||
Latest revision as of 09:37, 22 November 2022
Overview
The Nielsen SDK is one of multiple framework SDKs that Nielsen provides to enable measuring linear (live) and on-demand TV viewing using TVs, mobile devices, etc. The Browser SDK is the framework for browsers developers to integrate Nielsen Measurement into their Web pages. It supports static content measurement and can track key life cycle events of pages like:
- Site launch events and how long page is viewed
- Time of viewing a sub section / page.
Google Tag Manager provides easy-to-use tag templates for many Google and non-Google tools like Nielsen Browser SDK.
- The Google Tag Manager framework is place on a publisher’s web page making it easy to add and maintain tags across sites without additional code.
- All tag modification/additions, are performed via a point and click User Interface.
Prerequisites
To get started, an AppID is needed. The AppID is a unique ID assigned to the player/site/app. This will be provided upon starting the integration from Nielsen.
apid: "XXXXXXXXX-XXXX-XXXX-XXXX-XXXXXXXXXXXX" // eg. PDA7D5EE6-B1B8-XXXX-XXXX-2A788BCXXXCA
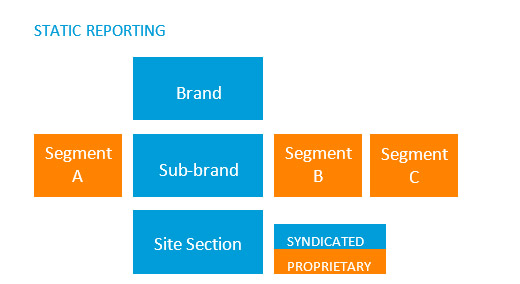
Reporting Structure
The figures below show the reporting structures for Static content:
Step 1: Create a new GTM Tag
Step 1.1: Prepare the code to load and initialize SDK with the page Metadata
Step 1.1.1: Prepare SDK Initialization API Call
NOLBUNDLE.nlsQ("<apid>", "<instanceName>",{nol_sdkDebug: "debug"})
When creating an instance, pass the following three values:
| Parameter | Description | Values |
|---|---|---|
| apid | Unique ID assigned to player/site | 'PXXXXXXX-XXXX-XXXX-XXXX-XXXXXXXXXXXX' |
| instanceName | Name of SDK instance | "any string value" |
| nol_sdkDebug | Enables Nielsen console logging. Only required for testing (not in production) | "{nol_sdkDebug: "debug"})" |
Example SDK Initialization API Call
<script>
var nSdkInstance = NOLBUNDLE.nlsQ('P51750D61-3152-4F5B-89A7-xxxxxxxxxx', 'nlsnInstance', {
      containerID: "my-sdkplayer",
      nol_sdkDebug: "debug"
    });
</script>
Step 1.1.2: Prepare Web Page Metadata
Web Page Metadata should be ready when initializing a new SDK instance.
The full description of the other key/value pairs for Metadata can be found here: AGF Metadata Convention for Static Measurement
Example Web Page Metadata Object
<script>
  window.articlemetadata = {
    type: "static",
    assetid: "Unique_page_ID",
	section:  "Unique_section_ID",
    segA: "Unique_section_segA",
    segB: "Mandatory_section_segB",
    segC: "Optional_section_segC",
    subbrand: "subbrand_received_from_Nielsen"
    };
</script>
Step 1.2: Login to your Google Tag Manager Account
- Signup for free at https://www.google.com/analytics/tag-manager/
Step 1.3: Add a new GTM Tag
From within the GTM interface, select Add New Tag

Step 1.4: Add Custom HTML code using the above prepared SDK Initialization API Call and page metadata
Insert the following code into the Custom HTML Window substituting the appid of P51750D61-3152-4F5B-89A7-xxxxxxxxxx for the appid provided by your Technical Account Manager.
<script>
	// Add Static Queue Snippet
	!function(e,n){
		function t(e){
			return"object"==typeof e?JSON.parse(JSON.stringify(e)):e
		}
		e[n]=e[n]||
		{
			nlsQ:function(o,r,c){
				var s=e.document,
				a=s.createElement("script");
				a.async=1,
				a.src=("http:"===e.location.protocol?"http:":"https:")+"//cdn-gl.nmrodam.com/conf/"+o+".js#name="+r+"&ns="+n;
				var i=s.getElementsByTagName("script")[0];
				return i.parentNode.insertBefore(a,i),
				e[n][r]=e[n][r]||{g:c||{},
				ggPM:function(o,c,s,a,i){e[n][r].q=e[n][r].q||[];try{var l=t([o,c,s,a,i]);e[n][r].q.push(l)}
				catch(e){console&&console.log&&console.log("Error: Cannot register event in Nielsen SDK queue.")}},
				trackEvent:function(o){e[n][r].te=e[n][r].te||[];try{var c=t(o);e[n][r].te.push(c)}
				catch(e){console&&console.log&&console.log("Error: Cannot register event in Nielsen SDK queue.")}}},
				e[n][r]
			}
		}
	}(window,"NOLBUNDLE");
	// create and intitialize a new SDK instance
    var nSdkInstance = NOLBUNDLE.nlsQ('P51750D61-3152-4F5B-89A7-xxxxxxxxxx', 'nlsnInstance', {
      containerID: "my-sdkplayer",
      nol_sdkDebug: "debug"
    });
    // create page/article metadata
	window.articlemetadata = {
    	type: "static",
    	assetid: "Unique_page_ID",
		section:  "Unique_section_ID",
    	segA: "Unique_section_segA",
    	segB: "Mandatory_section_segB",
    	segC: "Optional_section_segC"
    };
    // pass page/article metadata to the new SDK Instance for the measurement start
   nSdkInstance.ggPM('staticstart',  window.articlemetadata);
</script>
Step 1.5 Configure Page Trigger
Do not forget to setup the Firing Trigger for this Custom HTML within the GTM interface. The recommended default setting should be 'All Pages'.

Step 1.6: Embed the GTM Container Script within your Pages
- Once your container created in GTM, the script code snippet needs to be embedded within each webpage on your site.
- You will find your GTM Container Script under
ADMIN >> Install Google Tag ManagerIt will look similar to the below:
Paste this code as high in the <head> of the page as possible:
<!-- Google Tag Manager -->
<script>(function(w,d,s,l,i){w[l]=w[l]||[];w[l].push({'gtm.start':
new Date().getTime(),event:'gtm.js'});var f=d.getElementsByTagName(s)[0],
j=d.createElement(s),dl=l!='dataLayer'?'&l='+l:'';j.async=true;j.src=
'https://www.googletagmanager.com/gtm.js?id='+i+dl;f.parentNode.insertBefore(j,f);
})(window,document,'script','dataLayer','GTM-YourContainerTag');</script>
<!-- End Google Tag Manager -->
Additionally, paste this code immediately after the opening <body> tag:
<!-- Google Tag Manager (noscript) -->
<noscript><iframe src="https://www.googletagmanager.com/ns.html?id=GTM-YourContainerTag"
height="0" width="0" style="display:none;visibility:hidden"></iframe></noscript>
<!-- End Google Tag Manager (noscript) -->
Step 2: Review Privacy and Opt-Out
The Browser SDK measurement is working without cookies and other personal information. No user can be identified personally, therefore an opt-out functionality is not required. The Nielsen Browser SDK measurement is utilizing a cookieless domain.
In order to disclose Nielsen measurement privacy statement, please include the following items in your privacy policy:
- A notice that the player includes third party measurement software that allows users to contribute to market research with anonymous data.
- A link to the Nielsen Digital Measurement Privacy Policy located at https://nielsen.com/legal/privacy-principles/digital-measurement-privacy-statement/?lang=de .
Step 3: Testing
Monitoring Tools Testing the Browser Implementation
The steps to test the implementation are given below.
Step 3.1
Filter HTTP traffic with the string "nmr" to capture traffic from the SDK. This will capture traffic going to Nielsen servers.
Step 3.2
Verify that the Nielsen SDK is being downloaded correctly and is the correct version.
http://cdn-gl.nmrodam.com/novms/js/2/nlsSDK600.bundle.min.js
Step 3.3
When the page is loaded for the first time, the Browser SDK fires a View ping as soon as content is loaded. Utilizing your HTTP traffic filter tool, you can now validate the metadata that is being sent to the Nielsen collection servers.
Example View Ping Below:
https://secure-eu.nmrodam.com/cgi-bin/gn?prd=dcr&ci=us-500207&ch=us-500207_c77_Main-GTM_P&asn=Main-GTM&sessionId=8l2XGnAW6IC3Cc2MIMh0RYRTqimuU1553108759&prv=1&c6=vc,c77&ca=NA&c13=asid,P00BEB680-1F1A-47BB-922D-1BD2F1BA79A7&c32=...
Step 3.4
The first duration ping is fired after 5 minutes of content is viewed and is indicated by the cr value containing a D. This should fire every 5 minutes but only when the page is in focus.
http://secure-eu.nmrodam.com/cgi-bin/gn?prd=dcr&st=dcr&rt=text&forward=0&sup=0
&ad=0&asn=%2Fsdk2%2Findex2.html&ci=us-500270&c6=vc,c77&c9=devid,&c11=agg,1
&c12=apv,3&c13=asid,PAA3A8EF7-E6D2-4A9E-9787-BDXXXXXXXXXX&c15=apn,Test2
&c16=sdkv,bj.5.1.5&c26=dmap,1&c29=plid,14767465028039340&c30=bldv,1.0.0.15&c32=segA,USA
&c33=segB,CA&c34=segC,RSM&at=timer&cr=D&c27=cln,300&rnd=857576
Step 4: Going Live
Following Nielsen testing, users need to make a couple of updates to the initialization call to ensure that the site is being measured properly.
- Debug Logging: Disable logging by deleting
{nol_sdkDebug: 'debug'}from initialization call.
Example Production Initialization Call
Refer to the production initialization call below:
var nSdkInstance = NOLBUNDLE.nlsQ("P14273221-CF5C-46BF-A832-994AEFB7XXXX");
Note: before going live you have to inform Nielsen - this is necessary, because Nielsen team has to adjust internal configuration parameter to enable data collection. Without that notification no data will be collected and no data will be reported.
Step 5: Review the Sample Implementation for your Reference
The Sample Implementation for AGF located here.