DCR Static Google Tag Manager: Difference between revisions
From Engineering Client Portal
No edit summary |
No edit summary |
||
| Line 48: | Line 48: | ||
== Dynamic Parameters == | == Dynamic Parameters == | ||
=== Dynamic Variables === | === Dynamic Variables === | ||
There may be times when you will want to dynamically pass values to the DCR Static | There may be times when you will want to dynamically pass values to the DCR Static tag, and this can be accomplished for the following fields: AssetID, section, Segment A, Segment B and Segment C. | ||
=== Dynamic Example === | === Dynamic Example === | ||
Revision as of 16:22, 9 May 2019
Overview
Google Tag Manager provides easy-to-use tag templates for many Google and non-Google tools.
- The Google Tag Manager framework is place on a publisher’s web page making it easy to add and maintain tags across sites without additional code.
- All tag modification/additions, are performed via a point and click User Interface.
Quick Start - Adding DCR Static Measurement
Login to your Google Tag Manager Account
- Signup for free at https://www.google.com/analytics/tag-manager/
Create the Container Script
- Container script setup instructions are located here.
- Once created, the snippet needs to be embedded within each webpage on your site.
Paste this code as high in the <head> of the page as possible:
<!-- Google Tag Manager -->
<script>(function(w,d,s,l,i){w[l]=w[l]||[];w[l].push({'gtm.start':
new Date().getTime(),event:'gtm.js'});var f=d.getElementsByTagName(s)[0],
j=d.createElement(s),dl=l!='dataLayer'?'&l='+l:'';j.async=true;j.src=
'https://www.googletagmanager.com/gtm.js?id='+i+dl;f.parentNode.insertBefore(j,f);
})(window,document,'script','dataLayer','GTM-KMN8NG4');</script>
<!-- End Google Tag Manager -->
Additionally, paste this code immediately after the opening <body> tag:
<!-- Google Tag Manager (noscript) -->
<noscript><iframe src="https://www.googletagmanager.com/ns.html?id=GTM-KMN8NG4"
height="0" width="0" style="display:none;visibility:hidden"></iframe></noscript>
<!-- End Google Tag Manager (noscript) -->
Add the DCR Tag
- In Google Tag Manager, select an account and default workspace.
- To add a tag: Click NEW. Select the tag type (DCR Static) and specify the trigger to be on Page View.
![]()
- Populate DCR Static template with Nielsen variables.
Tag Parameters
Detailed information on the parameters for the script tag can be found on Digital Measurement Metadata. These parameters will automatically sent to Nielsen once the page is loaded completely. Please contact your Technical Account Manager for more details.
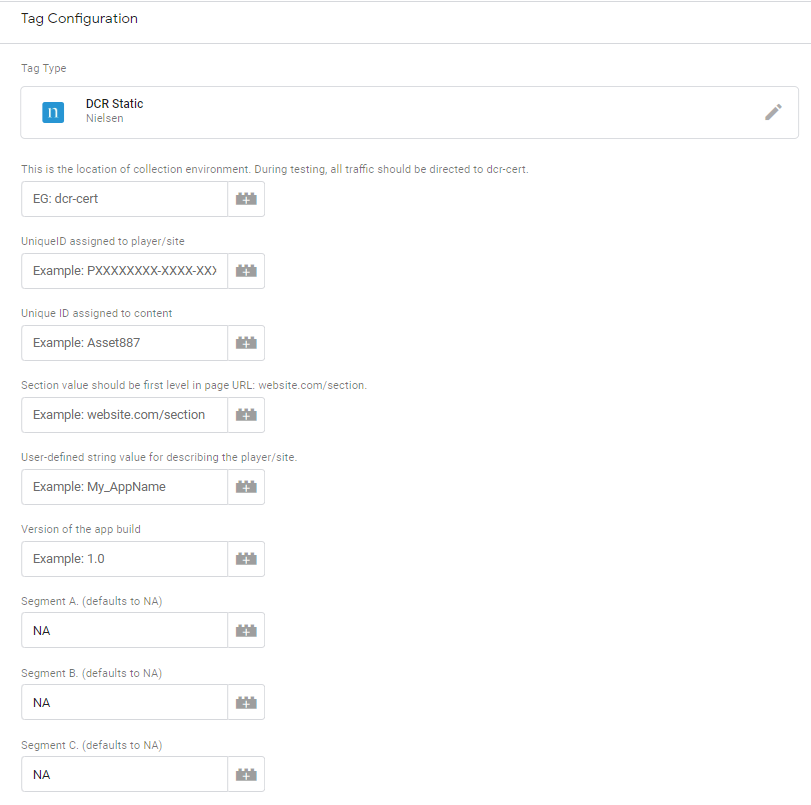
You should now be presented with a screen such as the one below:
Once these fields have been populated, you can Preview, and finally Publish. You have now fully implemented DCR Static Page Measurement to your site.
Dynamic Parameters
Dynamic Variables
There may be times when you will want to dynamically pass values to the DCR Static tag, and this can be accomplished for the following fields: AssetID, section, Segment A, Segment B and Segment C.
Dynamic Example
Immediately before the Google Tag Manager Container code, you can declare some variables and pass dynamic values. GTM currently supports the four following dynamic parameters. If no value is sent for the below variables, the values provided during the tag setup in GTM will take priority.
| Parameter Name | Description |
|---|---|
| nol_assetid | Unique ID for each article |
| section | section of each site (e.g. section value should be first level in page URL: website.com/section). Limit to 25 unique values |
| nol_segA | custom segment for reporting: Limit to 25 unique values across custom segments (segA + segB + segC) |
| nol_segB | custom segment for reporting: Limit to 25 unique values across custom segments (segA + segB + segC) |
| nol_segC | custom segment for reporting: Limit to 25 unique values across custom segments (segA + segB + segC) |
| debug | Enables Nielsen console logging. Only required for testing [true,false] |
For example:
<script>
  // param override
  window.NOLLite = {
//  debug: true,
 	"nol_assetid": "XXXXXXX",
 	"nol_section": "Main-GTM"
 	"nol_segA": "SegA_value_here",
 	"nol_segB": "SegB_value_here",
 	"nol_segC": "SegC_value_here"

  };
</script>
Note: If you do not select to pass any values dynamically, the values you placed in the Google Tag Manager Template will be used instead.
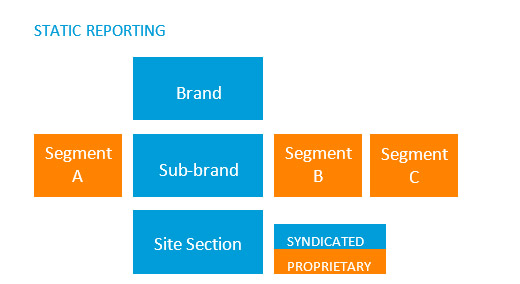
Reporting Structure
The figures below show the reporting structures for Static content:
Privacy and Opt-Out
User Opt Out
The site must provide a means for the user to opt-out of, or opt back into, Nielsen Measurement. A user can opt-out if they would prefer not to participate in any Nielsen online measurement research. To implement the User Opt-Out option, include the following two items in your privacy policy.
- A notice that the player (or page in relation to static measurement) includes proprietary measurement software that allows users to contribute to market research (such as Nielsen TV Ratings).
- A link to the Nielsen Digital Measurement Privacy Policy at https://priv-policy.imrworldwide.com/priv/browser/us/en/optout.html
On the Nielsen Digital Measurement Privacy Policy page, users can click Choices to read more detailed information about the measurement software, learn about their options with regard to Nielsen measurement, and, if they do not want to participate in Nielsen online measurement, click a link to receive an opt-out cookie.
- Once users have opted out via this link, their browser cookies will contain the value TOTAL_OPTOUT. This will prevent a redirect to our data provider from occurring
- Users can opt back in via this link. When a user selects that link, their opt-out cookie will be deleted and they will be able to be measured moving forward.
The following paragraph is a template for a Privacy Statement.
The properties may feature Nielsen proprietary measurement software, which will allow users to contribute to market research, such as Nielsen TV Ratings. To learn more about the information that Nielsen software may collect and your choices with regard to it, please see the Nielsen Digital Measurement Privacy Policy at https://priv-policy.imrworldwide.com/priv/browser/us/en/optout.html
User Opt Back In
Once users have opted-out, they can choose to opt back into Nielsen Measurement at anytime by selecting the opt back in link on the Nielsen Digital Privacy Policy page. When a user selects the link, their opt-out cookie will be deleted and they will be able to be measured.
Testing
Monitoring Tools Testing the Browser Implementation
The steps to test the implementation are given below.
Step 1
Filter HTTP traffic with the string "imr" to capture traffic from the SDK. This will capture traffic going to Nielsen servers.
Step 2
Verify that the Nielsen SDK is being downloaded correctly and is the correct version.
http://cdn-gl.imrworldwide.com/novms/js/2/nlsSDK600.bundle.min.js
Step 3
When the page is loaded for the first time, the Browser SDK fires a View ping as soon as content is loaded. Utilizing your HTTP traffic filter tool, you can now validate the metadata that is being sent to the Nielsen collection servers.
Example View Ping Below:
https://secure-dcr.imrworldwide.com/cgi-bin/gn?prd=dcr&ci=us-500207&ch=us-500207_c77_Main-GTM_P&asn=Main-GTM&sessionId=8l2XGnAW6IC3Cc2MIMh0RYRTqimuU1553108759&prv=1&c6=vc,c77&ca=NA&c13=asid,P00BEB680-1F1A-47BB-922D-1BD2F1BA79A7&c32=...
Step 4
The first duration ping is fired after 5 minutes of content is viewed and is indicated by the cr value containing a D. This should fire every 5 minutes but only when the page is in focus.
http://secure-dcr.imrworldwide.com/cgi-bin/gn?prd=dcr&st=dcr&rt=text&forward=0&sup=0
&ad=0&asn=%2Fsdk2%2Findex2.html&ci=us-500270&c6=vc,c77&c9=devid,&c11=agg,1
&c12=apv,3&c13=asid,PAA3A8EF7-E6D2-4A9E-9787-BDXXXXXXXXXX&c15=apn,Test2
&c16=sdkv,bj.5.1.5&c26=dmap,1&c29=plid,14767465028039340&c30=bldv,1.0.0.15&c32=segA,USA
&c33=segB,CA&c34=segC,RSM&at=timer&cr=D&c27=cln,300&rnd=857576
Step 5
Test Opt-Out